Results 1 to 12 of 12

Thread: Photoshop resources.

  1. #1
    Dead
    Member

    Join Date
    Nov 2010
    Location
    Illinois Valley
    Posts
    690
    United States

    Photoshop resources.

    Thought I'd throw this up here. A collection of photoshop resources. Photoshop can be a bit daunting when starting out, lots of things like layer blend modes and masking aren't exactly intuitive, and it can be a bit confusing as to what all the tools and palettes are for and when you should use them.

    So I'll post some of the resources from my bookmarks collection and then add more as I find them. Anyone else that has any additional resources for photoshop or just digital imaging in general is encouraged to post them also.

    Layer Blend Modes:
    http://www.photoshopessentials.com/p...d-modes/intro/
    http://psd.tutsplus.com/tutorials/to...des-photoshop/
    http://en.wikipedia.org/wiki/Blend_modes
    http://www.youtube.com/watch?v=Ik6MAbzlQ40
    http://www.myinkblog.com/an-explanat...p-blend-modes/

    Masking:
    http://www.photoshopessentials.com/b...s/layer-masks/
    http://designshack.net/articles/grap...-in-photoshop/
    This is an excellent masking tutorial video for CS5 and above with new masking features:http://tv.adobe.com/watch/the-russel...photoshop-cs5/

    - - - Updated - - -

    For you guys that like to do panoramas, CS5 and above has some nice new features with the new "content aware" system. In this video you can see how photoshop automatically fills in all the gaps of a panoramic photomerge:

  2. #2
    Dead
    Member

    Join Date
    Nov 2010
    Location
    Illinois Valley
    Posts
    690
    United States
    Not a tutorial, but just explaining the way i learned to do sharpening. If you sharpen a color image you end up with "chromatic abberations" which is just another way of saying colored noise, aka-halos.
    So to avoid this, before you sharpen a photo, you convert the photo to black and white. But not by deleting the color information.
    Instead, convert the photo to LAB mode by clicking "image>mode>LAB. This should be the last step when retouching a photo because changing the mode has unexpected consequences on layer display. So this is done after all your other edits are made and you flatten the image.
    After you convert the image to LAB mode, go to your channels palette(which is a tab to the right in the layers palette). You'll have an "L" channel, an "A" channel, and a "B" channel(L-A-B), click on the L channel and it will switch off the A and B channels leaving you with only the L channel switched on which is the Lightness/Luminosity channel which is a grayscale channel. The image turns to grayscale.
    Then go to the filters menu-Filter>sharpen>unsharp mask. In the dialog box that pops out, many people like to start with a microsharpen that brings out some of the finer details, so you set your amount to around 20-60 depending on how much sharpening you want, set the pixel radius to .5-.6 and leave the threshold at 0.
    Next you do another pass, Filter>sharpen>Unsharp Mask. But this time you set your amount lower at around 5-20, and set your pixel radius to 10-20 and threshold stays at 0.
    Now go back into your channels palette and switch the A and B channels back on to restore the color data. Now back to the image menu and convert the image back to RGB mode.

    If the image is to be displayed on the web it will look best across all browsers if you embed the sRGB color profile into the image. To do this in the photoshop menu, click Edit>Convert To Profile and choose sRGB.

  3. #3
    Feeding shootemindehead's Avatar
    Member

    Join Date
    Feb 2009
    Location
    Dublin
    Posts
    4,069
    Ireland
    Content Aware fill is probably the greatest thing to appear in PS in years.
    I'm runnin' this monkey farm now Frankenstein.....

  4. #4
    Dead
    Member

    Join Date
    Nov 2010
    Location
    Illinois Valley
    Posts
    690
    United States
    Quote Originally Posted by shootemindehead View Post
    Content Aware fill is probably the greatest thing to appear in PS in years.
    I know. And it's not just fill, there's a content aware mode on several other tools also. The spot healing tool, there's content aware scale, and they all work well with the new puppet warp feature. A practical application of puppet warp is to align panoramas, but it's possibilities are endless for those that do photo manipulations.
    The new masking features are also incredible. You used to have to use a plugin or do most of the advanced masking work by hand.

  5. #5
    Webmaster Neil's Avatar
    Administrator

    Join Date
    Jan 2006
    Location
    nr London
    Posts
    16,294
    England
    Quote Originally Posted by babomb View Post
    That is amazing!

    I suspect some of this technology is what helps with the 2D -> 3D film conversions now I guess?!
    Look again at that dot. That's here. That's home. That's us. On it everyone you love, everyone you know, everyone you ever heard of, every human being who ever was, lived out their lives. The aggregate of our joy and suffering, thousands of confident religions, ideologies, and economic doctrines, every hunter and forager, every hero and coward, every creator and destroyer of civilization, every king and peasant, every young couple in love, every mother and father, hopeful child, inventor and explorer, every teacher of morals, every corrupt politician, every "superstar," every "supreme leader," every saint and sinner in the history of our species lived there--on a mote of dust suspended in a sunbeam. [click for more]
    -Carl Sagan

  6. #6
    Feeding LouCipherr's Avatar
    Member

    Join Date
    Feb 2006
    Location
    Hell
    Posts
    4,029
    United States
    Quote Originally Posted by Neil View Post
    That is amazing!
    AGREED!

    *frantically starts bookmarking links*

    Dude, thanks a ton for the links and info. They will come in quite handy I imagine...

  7. #7
    Dead
    Member

    Join Date
    Nov 2010
    Location
    Illinois Valley
    Posts
    690
    United States
    Quote Originally Posted by Neil View Post
    That is amazing!

    I suspect some of this technology is what helps with the 2D -> 3D film conversions now I guess?!
    I'm not sure how they do that now. It just occured to me, why don't I know how they do that!?
    I know they film in 3D using stereoscopic cameras. I just got the upgrades a few weeks back to all my design apps. Cinema4D R13 allows you to render to stereoscopic 3D now, it actually allows you to render to simulations of real physical camera sensors. You can render to a RAW file and deal with it like you would a RAW file right out of a camera. Even a RedOne camera.
    I'm just diving into Photoshop CS6 Extended. I get dirt cheap upgrades on volume licenses through an architect firm I used to work for. I still do a small amount of work for them occasionally, just about enough to pay for my application licensing. At this point that's all I care about though.
    I also get stock photo collections on DVD in the mail because I guess my subscription through them is still active through the architect firm?

    I'm gonna dive into CS6's new features and do some photo manipulations.

    Neil, how'd that flyboy image work out for you? Hopefully we can see the finished display you put together when you it's done!?

  8. #8
    Dead Trancelikestate's Avatar
    Member

    Join Date
    Aug 2006
    Location
    Pittsburgh, Pennsylvania, United States
    Posts
    773
    United States
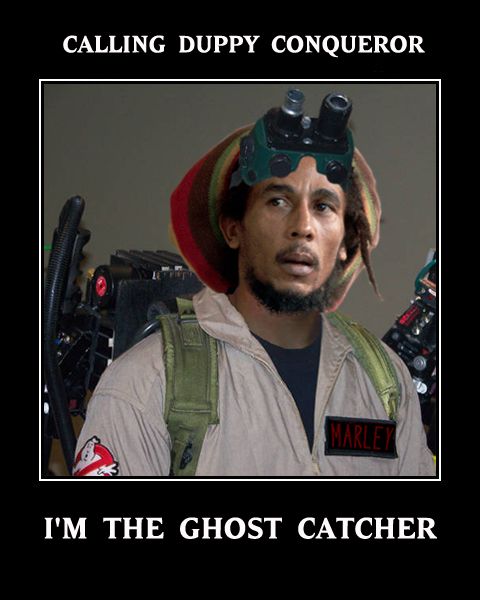
    Damn! I'm not half bad with PS but I didn't know about that! That is frickin sweet. I made this image last week. Here's a brief explanation of why I made it. Bob Marley was once a Ghostbuster! In the songs Mr. Brown and Duppy Conqueror Bob refers to conquering duppy's and being a ghost catcher. Duppy is an old African word for spirit or ghost. So being a huge fan of both, I put them together. Duppy conqueror COULD be taken as an old Jamaican way of saying Ghostbuster!


    I created his nametag with a flat 2d image and used the puppet warp to make it appear angled. Mind you I did not spend hours on this. I'm definitely gonna be experimenting with content aware!


  9. #9
    Dead
    Member

    Join Date
    Nov 2010
    Location
    Illinois Valley
    Posts
    690
    United States
    The only thing that really looks off on that image is the lighting on the goggles and the fact that there's no shadow where the goggles meet the skin. You can fix that easily with an exposure adjustment layer to bring down the lighting on the goggles. And then use a drop shadow and/or inner shadow layer style for the layer with the goggles. Or just take the burn tool and set it to shadow mode, with a low exposure of maybe 15 and go around the area where the goggles meet the skin.
    The nametag looks fine aside from maybe a little too saturated on the text.

    Anytime you want to match the color between 2 seperate images, you can just open both images in photoshop and focus on the one you want to change, then go to image>adjustments and scroll down to "match color" and in the dialog that pops up choose the other image you have open as the source and it will give the image you're working on the same colors and tone as the other image you have open.

    Also, it makes a huge difference if you mask your images properly as opposed to just erasing the parts you don't want. Masking gives you the subtle transitions where erasing just gives you a sharp edge. It's always best to do things non-destructively. When you simply delete and erase pixels, that's a destructive process. When you mask away the parts you don't want it's non-destructive and preserves the tone of the entire image and allows the subtle transitions and graduations between colors and tone.
    Last edited by babomb; 15-May-2013 at 03:33 AM. Reason: ..

  10. #10
    Webmaster Neil's Avatar
    Administrator

    Join Date
    Jan 2006
    Location
    nr London
    Posts
    16,294
    England
    Quote Originally Posted by babomb View Post
    Neil, how'd that flyboy image work out for you? Hopefully we can see the finished display you put together when you it's done!?
    Paused at the moment... Other stuff top of the list at the moment
    Look again at that dot. That's here. That's home. That's us. On it everyone you love, everyone you know, everyone you ever heard of, every human being who ever was, lived out their lives. The aggregate of our joy and suffering, thousands of confident religions, ideologies, and economic doctrines, every hunter and forager, every hero and coward, every creator and destroyer of civilization, every king and peasant, every young couple in love, every mother and father, hopeful child, inventor and explorer, every teacher of morals, every corrupt politician, every "superstar," every "supreme leader," every saint and sinner in the history of our species lived there--on a mote of dust suspended in a sunbeam. [click for more]
    -Carl Sagan

  11. #11
    Dead
    Member

    Join Date
    Nov 2010
    Location
    Illinois Valley
    Posts
    690
    United States
    I was playin with the puppet warp feature a little while ago. Just for shits. Don't want to spend much time on a non-project.

    But it's Barry's Worst Week Ever:


    Photos weren't a good match. But it's hard to find good photos of those hats.
    Last edited by babomb; 15-May-2013 at 10:28 PM. Reason: .

  12. #12
    Dead
    Member

    Join Date
    Nov 2010
    Location
    Illinois Valley
    Posts
    690
    United States


    Last edited by babomb; 06-Jun-2013 at 11:32 AM. Reason: .

Bookmarks

Posting Permissions

  • You may not post new threads
  • You may not post replies
  • You may not post attachments
  • You may not edit your posts
  •